Register Developer Account - Enrolling as an Organization
Requirements:
- An Apple device, such as an iPhone, iPad, or Mac computer to complete Apple’s two-factor authentication process. Apple requires two-factor authentication for all Apple IDs and requires Developer Account Holders to sign in to their Apple Developer account using two-factor authentication. Two-factor authentication is built directly into iOS, macOS, tvOS, watchOS, and Apple websites which all require an Apple device such as an iPhone, iPad, or iPod touch with iOS 9 and later, or a Mac with OS X El Capitan or later. See, Apple’s Support: Two-Factor Authentication to learn how to set up two-factor authentication on your Apple device.
- An Apple ID. You can create an Apple ID using either your personal email address or an email address associated with your business. When creating an Apple ID, keep in mind that Apple will use the email address you choose to bill the annual $99 (USD) publisher fee and email you app updates. Follow this link to learn how to create your Apple ID. Be aware that creating an Apple ID is not the same as creating an Apple Developer account.
- An email address. You can begin your enrollment in the Apple Developer Program using a personal email address, such as yourname@gmail.com, but Apple will eventually require you to provide a private email that uses the domain name associated with your business’s website, such as email@yourbusiness.com.
- D-U-N-S® Number. A D-U-N-S Number is a unique numeric identifier assigned to a business by Dun & Bradstreet (D&B). It is used by Apple to validate your business’s identity and legal status. You cannot enroll in the Apple Developer Program without a D-U-N-S Number. To acquire a D-U-N-S, see Requesting a D-U-N-S Number on the Apple Developer website. Keep in mind that the information you submit when requesting a D-U-N-S Number must match the information you submit when enrolling in the Apple Developer Program. For example, the legal entity name for your business must be spelled and stylized the same way in both enrollment forms. After you acquire a D-U-N-S Number, you can use the D-U-N-S look up tool to pull up your D-U-N-S Number and related information at any time.
- A business website URL. We recommend using a publicly available website with a domain name associated with your organization.
- Verification call. After you submit the necessary information to enroll in the Apple Developer Program, Apple will call you to verify your information. During this call, you must be able to provide Apple with your D-U-N-S Number and the information you used to request a D-U-N-S Number. You must also be able to show Apple your business information (such as your business location addresses and business hours) on your own website.
Enrolling as an Organization
- Go to the Apple Developer Program enrollment page and click Start Your Enrollment.
- Log in with your Apple ID and password.
- Apple will prompt you to complete two-factor authentication. Click Allow on your mobile device to receive a verification code.
- Under Two-factor Authentication on your browser, enter the verification code sent to your mobile device and click Continue.
- Read the Apple Developer Agreement, select the By checking this box I confirm that I have read and agree to be bound by the Agreement above checkbox and click Submit.
- If Apple updates the license agreement for the Apple Developer Program before your App is launched, you must accept the new agreement.
- Click Continue enrollment on the web.
- Under I develop apps as, select Company / Organization and click Continue.
- Under Authority to Sign Legal Agreements, select the appropriate option:
- I am the owner/founder and have the authority to bind my organization to legal agreements
- If you select this option, enter your email address in the Work Email The email address you enter must match the one you provided when requesting a D-U-N-S Number.
- My organization has given me the authority to bind it to legal agreements
- If you select this option, in the Verification Contact field, enter a senior employee’s contact information. Apple will use this information to contact the senior employee at your organization and confirm enrollment in the Apple Developer Program.
- I am the owner/founder and have the authority to bind my organization to legal agreements
- Under Organization Information, enter the information for your organization:
- In the Legal Entity Name field, enter the name of your business as it appears in the D-U-N-S lookup.
- Your enrollment will not be successful if the legal entity name does not match the one in the D&B profile.
- In the D-U-N-S Number field, enter the nine-digit D-U-N-S Number assigned to your business.
- In the Website field, enter the website URL for your organization.
- The website URL can be a publicly available website with a domain name associated with your organization
- In the Headquarters Phone field, enter a phone number where Apple can reach you to verify enrollment.
- In the Tax ID/National ID field, enter your organization’s Tax ID/National ID.
- This is an optional field.
- Type the correct characters in the CAPTCHA.
- In the Legal Entity Name field, enter the name of your business as it appears in the D-U-N-S lookup.
- Click Continue.
- If you receive an error message under the Legal Entity Name field, click update your D&B profile and submit your business’s information. You may continue this procedure once your profile has been updated.
- On the Summary for Review page, review and confirm the information. Select the This is the correct headquarters address for my organization checkbox and click Submit.
- After submitting your application, Apple will contact you to verify your enrollment information.
- During this call, you must be able to provide Apple with your D-U-N-S Number and the information you used to request a D-U-N-S Number.
- Apple will send a confirmation email to your Apple ID email address with a link enclosed to confirm and pay for your developer membership. The $99 (USD) membership is billed annually.
- We strongly suggest you sign up for Automatic Renewal payments to prevent service disruption. When you are paying for your Apple Developer Program membership, review your purchase details and select Automatic Renewal. If you do not select Automatic Renewal, please set an annual reminder to renew your membership. Your app will be removed from the App Store within 24 hours upon the expiration of your membership.
Signing Credentials
Beginning with macOS Catalina (10.15), Apple is requiring all software distributed outside of the Mac App Store (Direct Distribution) to be signed and notarized. Software that isn’t properly signed or notarized will be shown an error message with the only actionable option being to “Move to Bin”. The software cannot be run even from the command-line.

Apps submitted to TestFlight need to be signed with an App Store Distribution Profile.
For information on how to set up these code signing identities, see Developer Account Help.
This means you will need to create the following certificates and profiles:
- 1x Application Identifier - This contains your Bundle ID(e.g.
com.example.app) and associated Capabilities - 2x Certificates
- 1x Developer ID Application Certificate for Direct Distribution
- 1x Apple Distribution for App Store Distribution
- 2x Provisioning Profiles
- 1x Developer ID Application Profile for Direct Distribution
- 1x App Store Distribution Profile for App Store Distribution
| TestFlight/App Store Distribution | Direct/External Distribution | |
|---|---|---|
| Certificate | Apple Distribution: TTT | Developer ID Application: TTT |
| Provisioning Profile | App Store Distribution: TTT | Developer ID Application: TTT |
See Which certificate should I use to sign my Mac OS X application? for more information about the various Certificate types
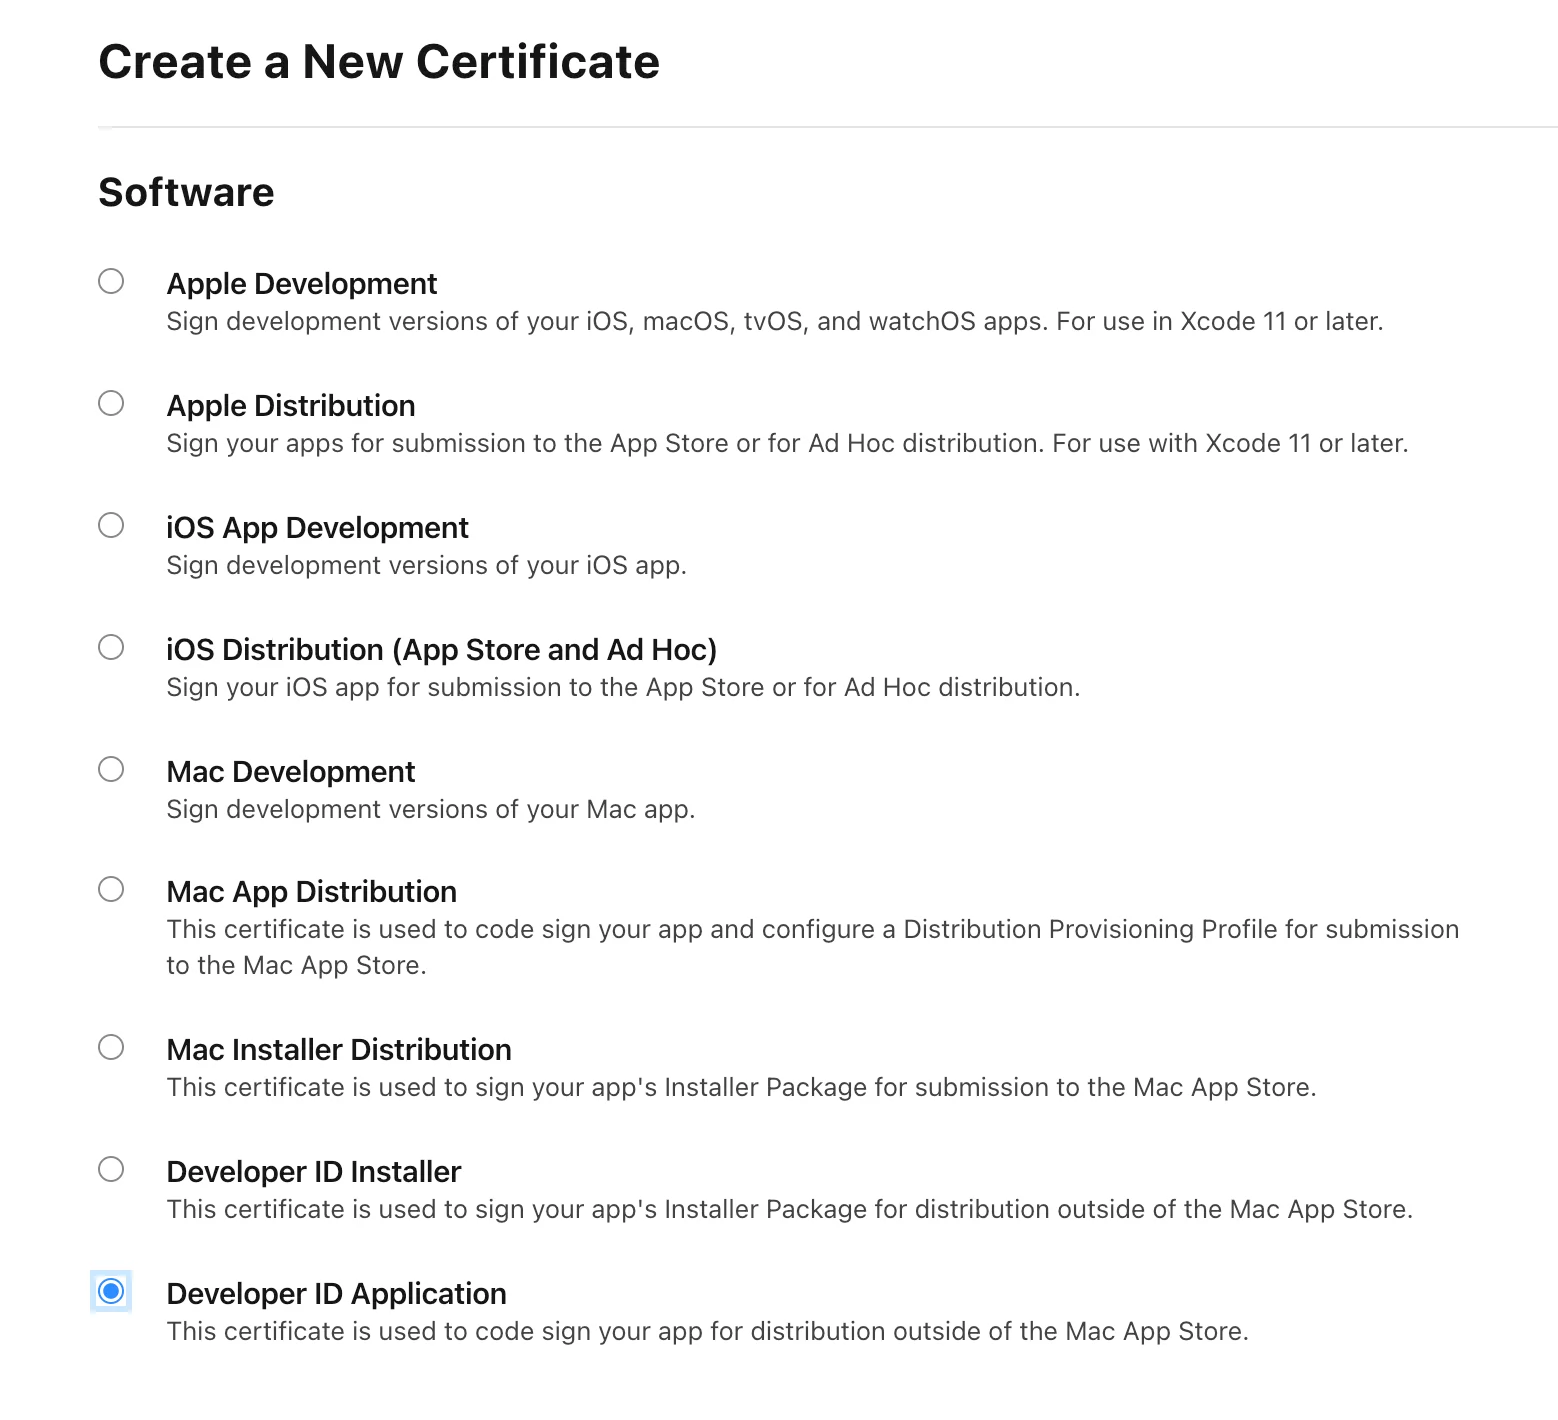
Create a Signing Certificate
You may need to create 2 of these (depending on your distribution methods)
We start by obtaining the certificates. After logging to your developer account and selecting Certificates, you should be able to create a new certificate. From all the listed types, select Developer ID Application as per its description.
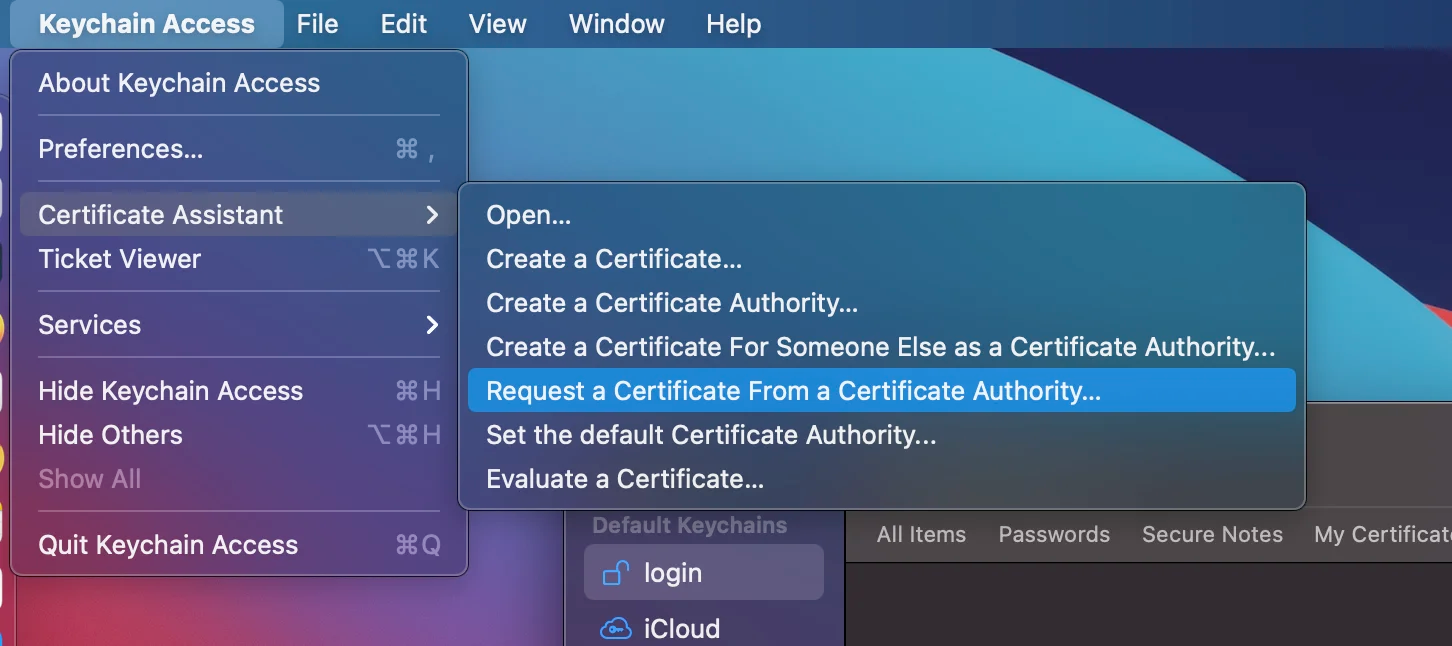
To be able to obtain the certificate, you need to create a Certificate Signing Request (CSR) first, which you can easily get by opening Keychain Access and going to Certificate Assistant -> Request a Certificate from a Certificate Authority
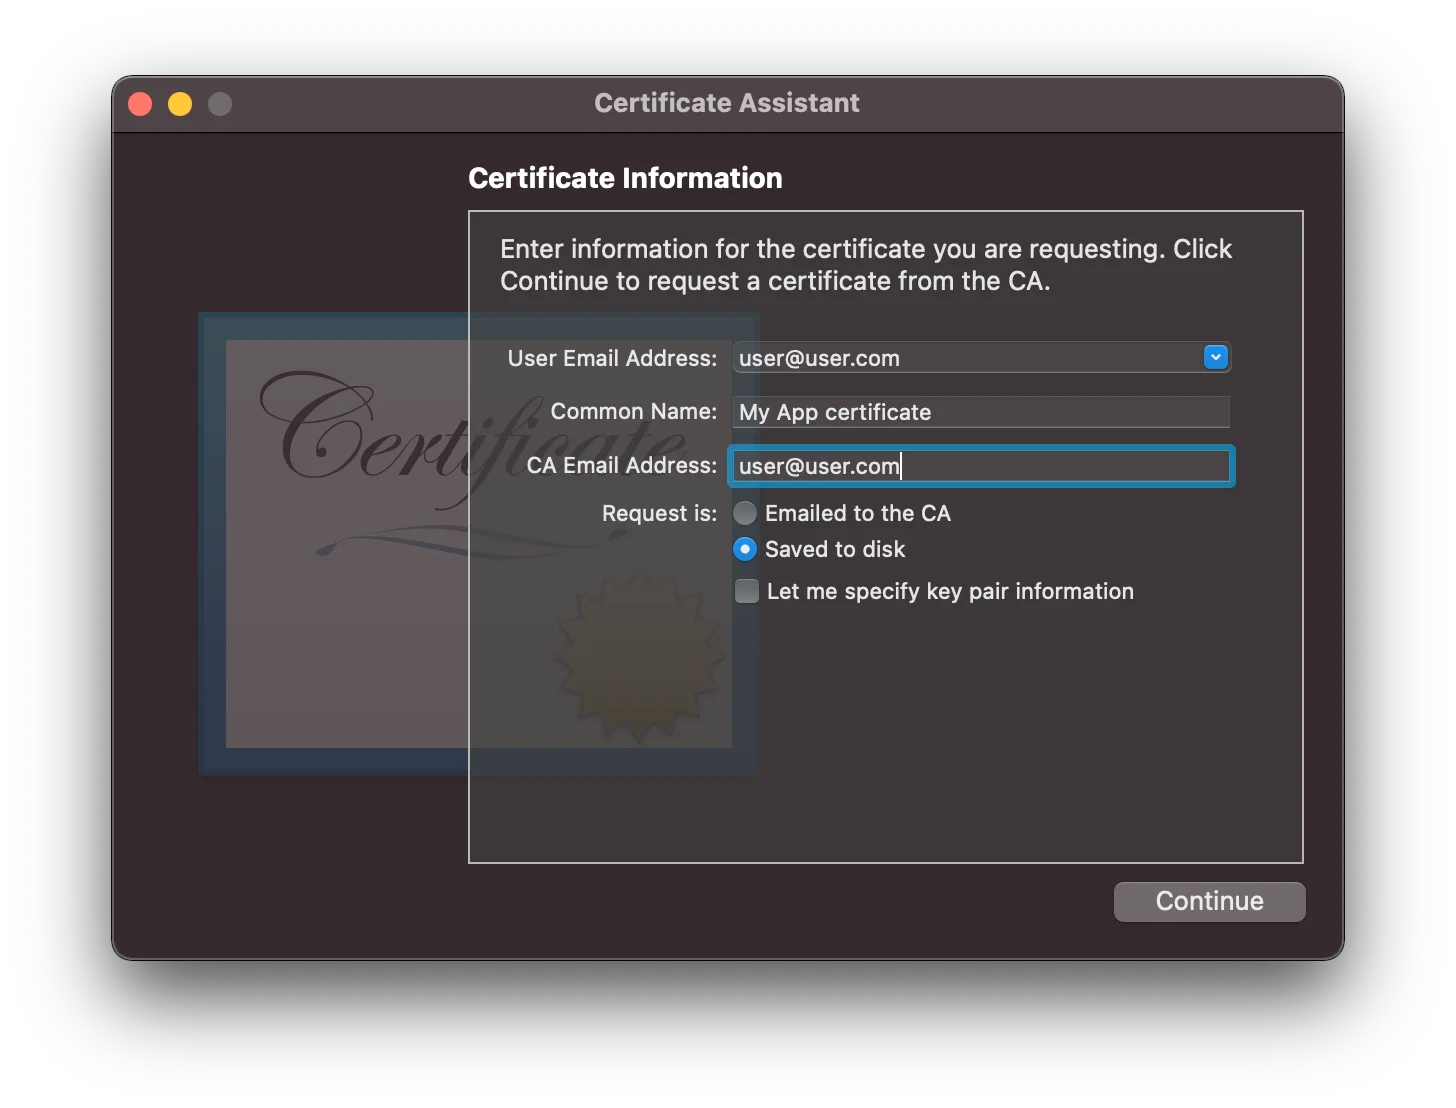
Fill in the necessary information and select your request to be Saved to disk. Note that the email address should be the same as the one you’re logging to the developer account. For an organization you can use something like marketplace@example.com
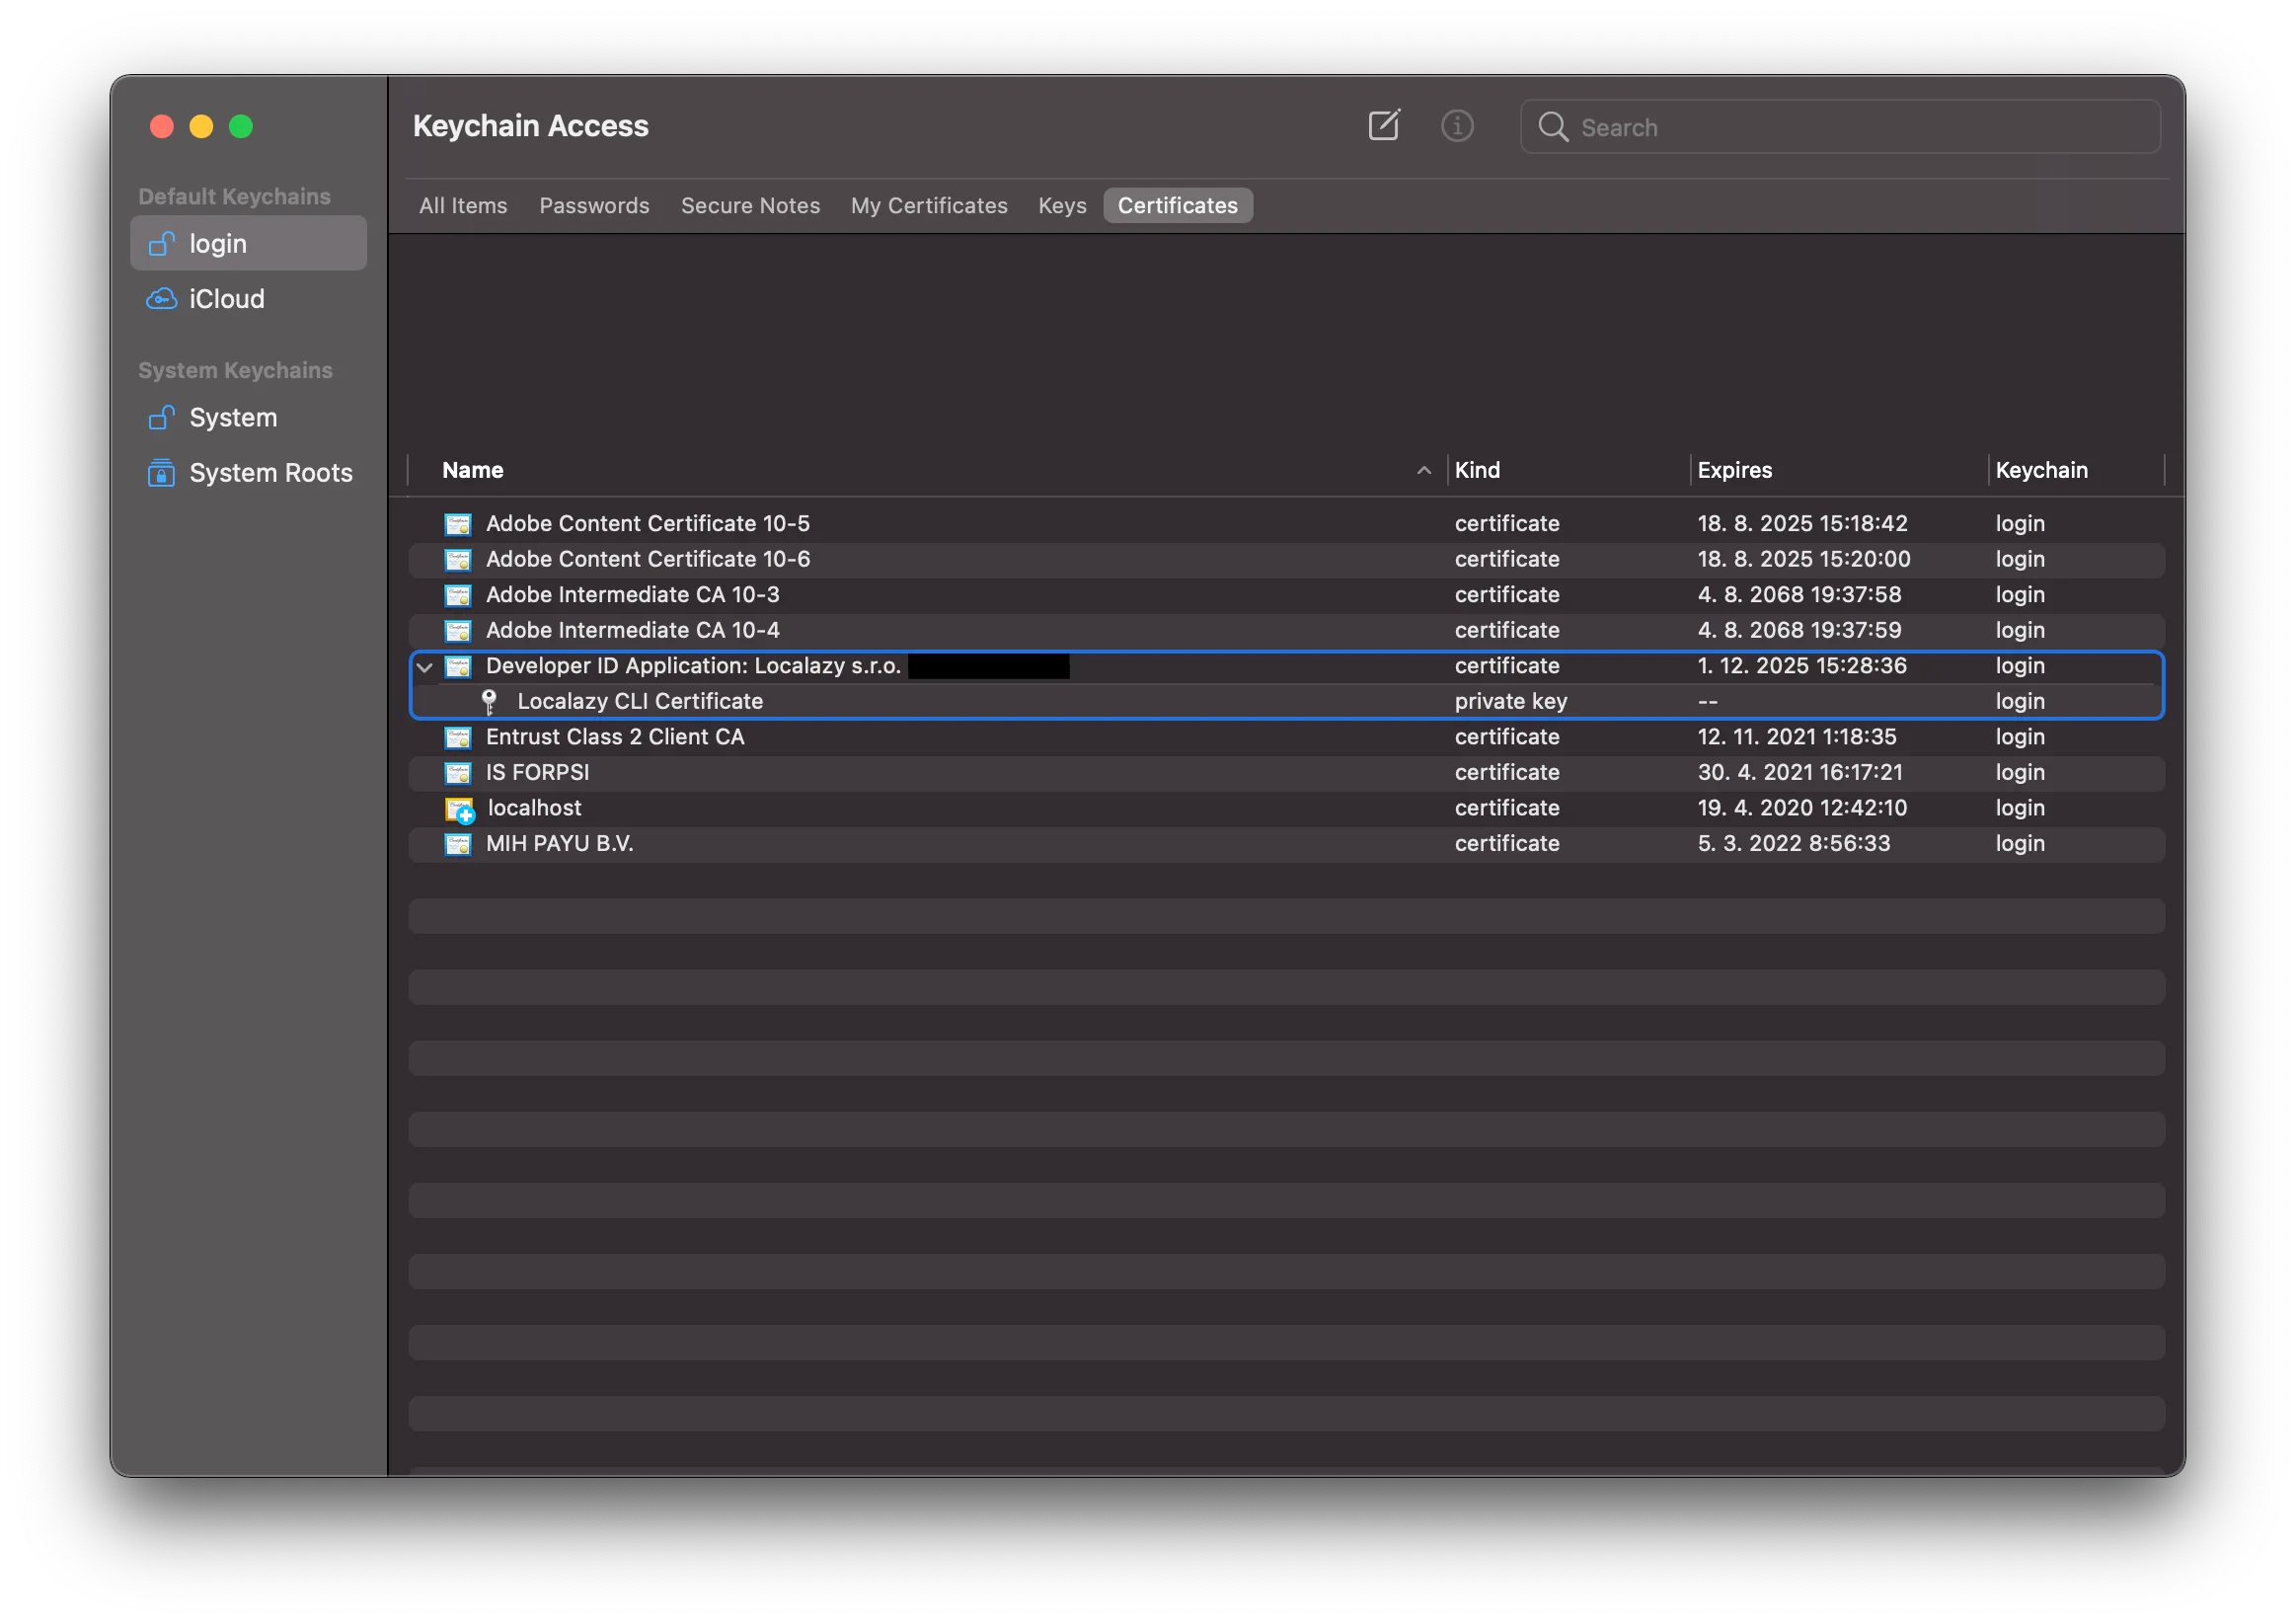
You can then upload the CSR request file to the web which should successfully create a new certificate for you. Download it and add it to your Keychain Access by simply opening it. The certificate should be added to one of your default keychains and not to the system; otherwise you might later have troubles exporting it.
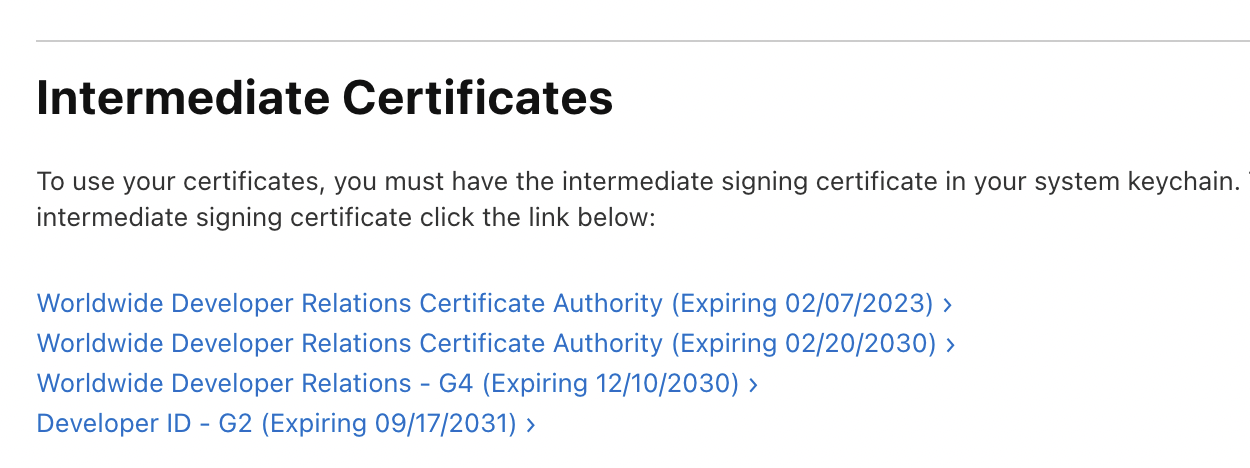
If you see a “certificate is not trusted” error for the Certificate in your Keychain, you will need to install the Apple Worldwide Developer Relations Certification Authority certificate.
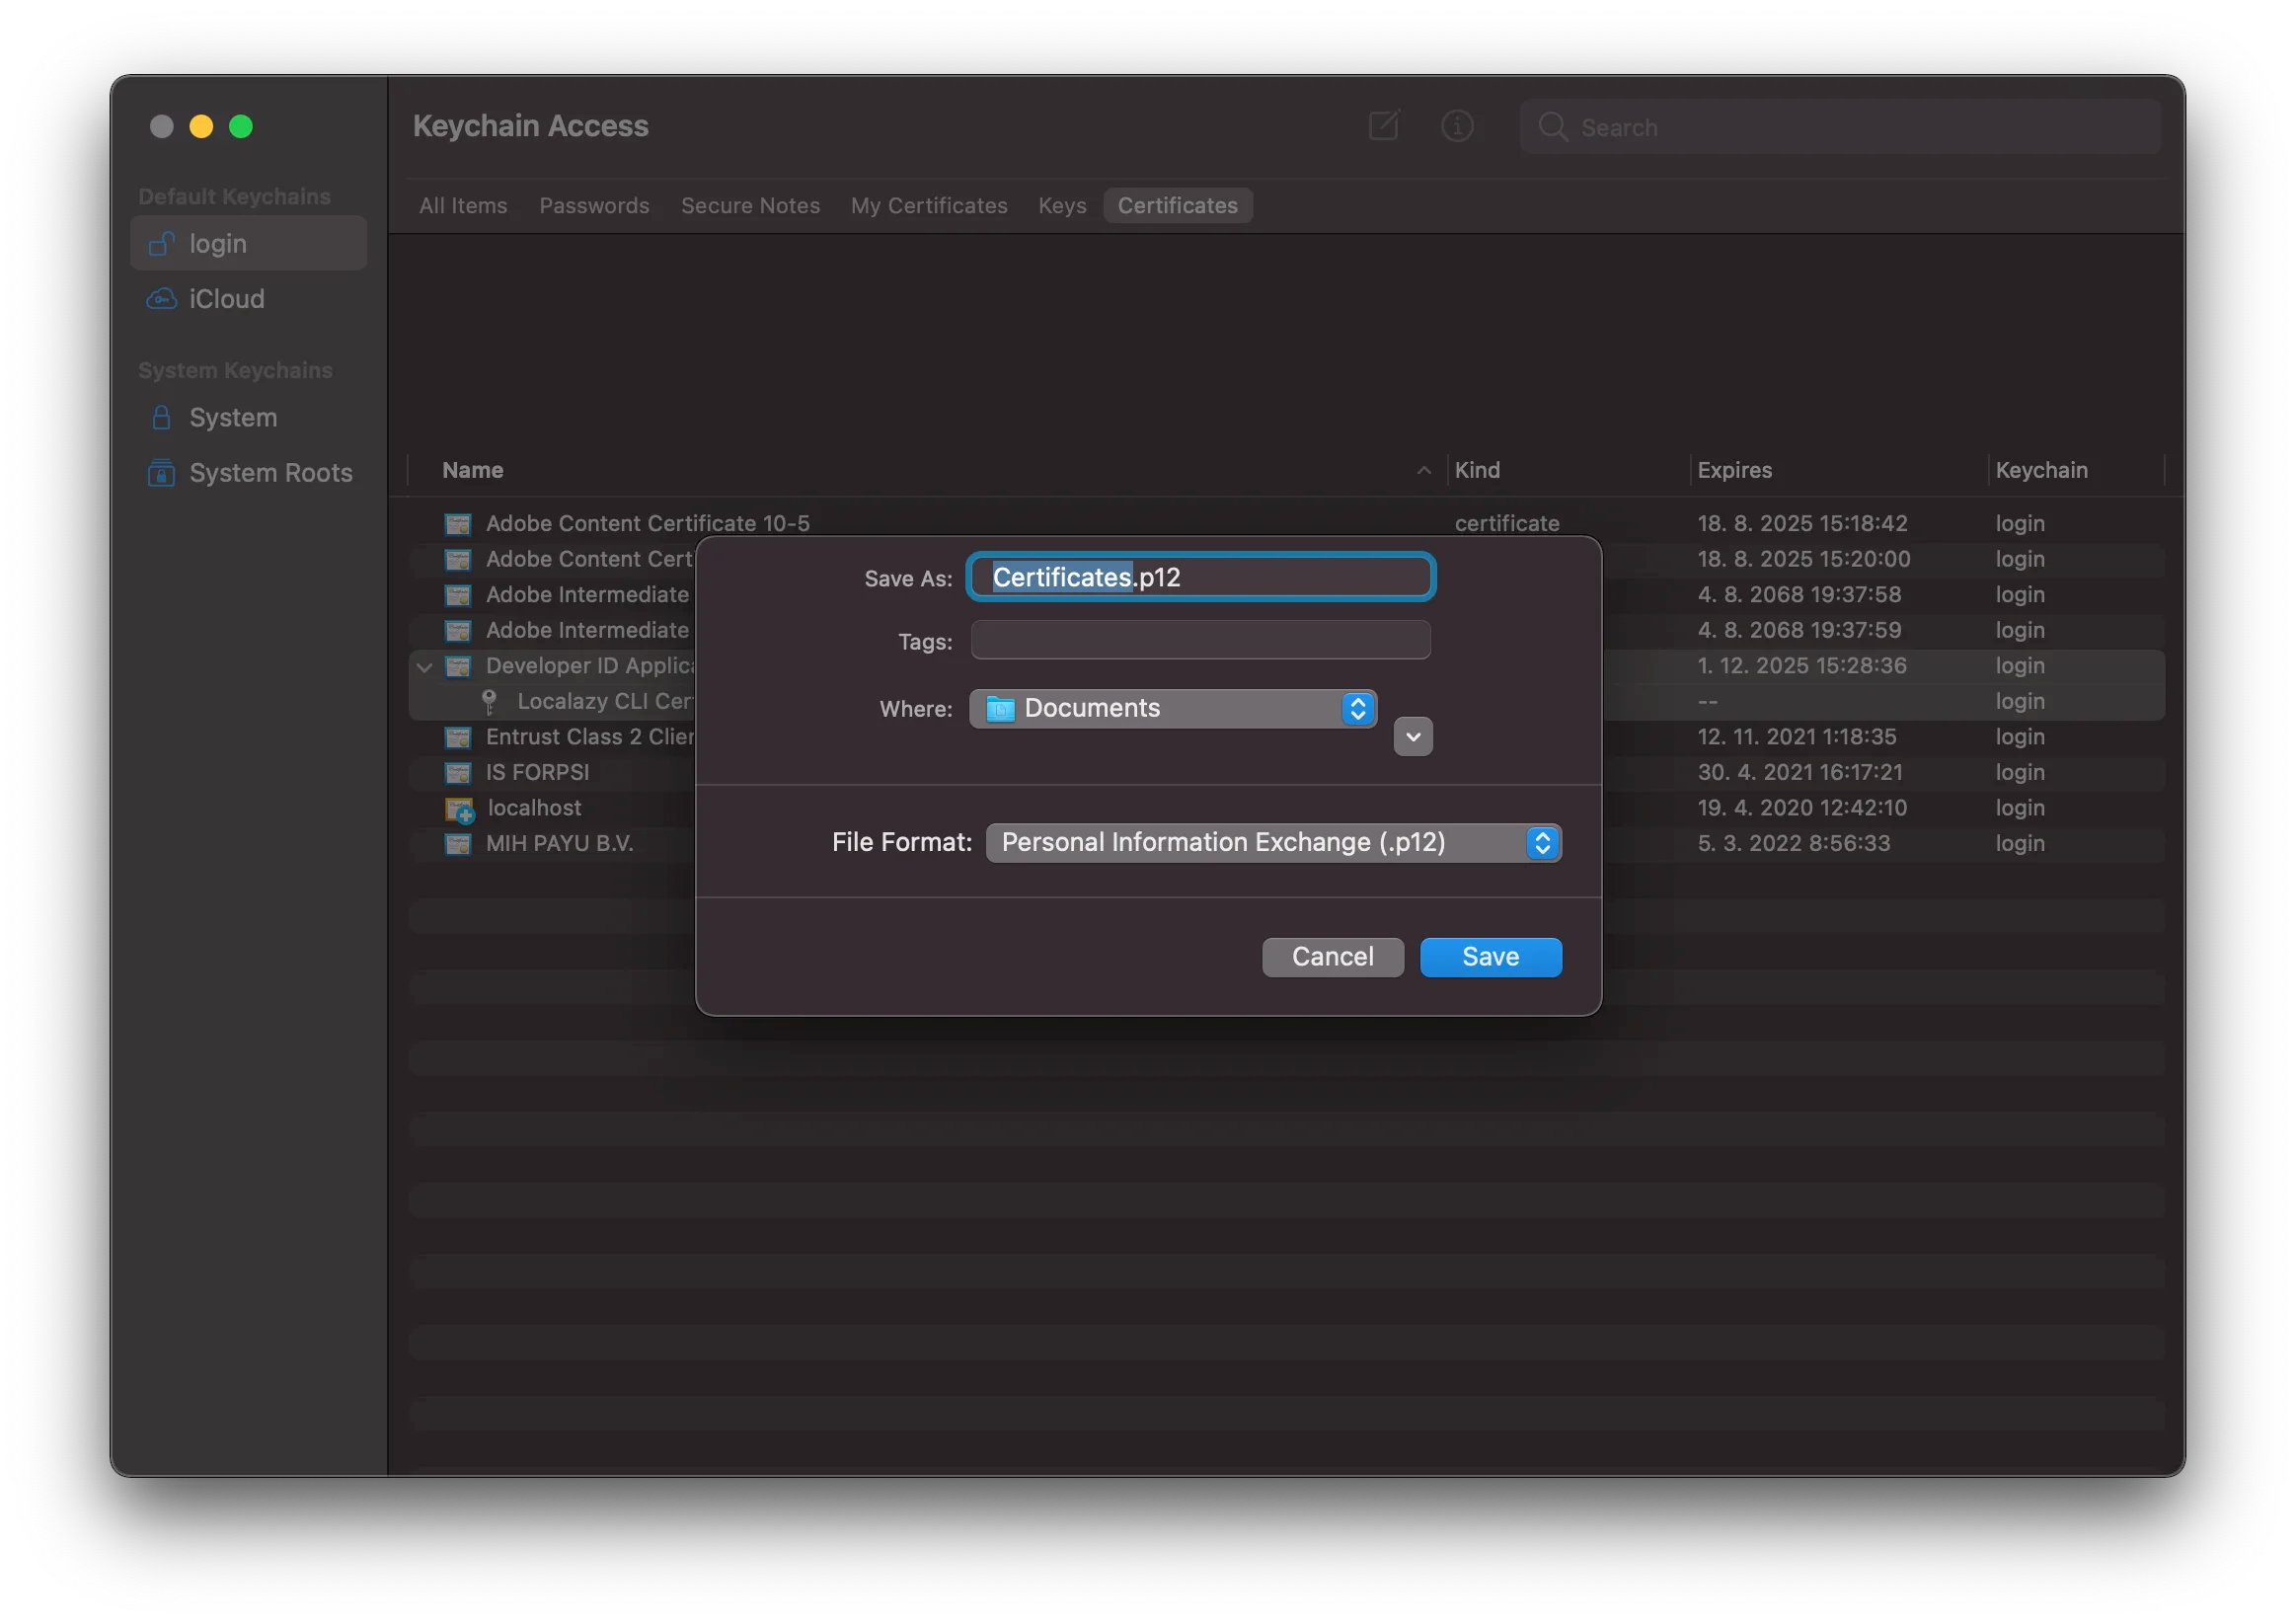
To be able to use the certificate for automated code signing, we need some format which would allow us to store the certificate as a string, so we can later add it to Github Secrets as an environment variable. For that purpose, we’ll make use of a little trick by encoding it to base64 first and then decoding it during the workflow. Let’s export the certificate by selecting both the certificate and its private key, invoke its context menu and select Export 2 items …. From the available formats pick Personal Information Exchange (.p12). Then it will ask you to create a password for it. Generate it and note it down, we’ll need it shortly.
Developer ID signing identities are precious. Anyone with access to one can ship code as you. Given that, you should treat them with care:
- You should not create them unnecessarily. Most folks only need to create one (well, one each for Developer ID Application and one Developer ID Installer). For a large organisation it might make sense to create a few, one for sub-units within the organisation.
- You should carefully manage access to them. Remember, if one leaks then folks will be able to start shipping code as you.
If you’re trying to create a new Developer ID signing identity because you’ve misplaced your previous ones, I encourage you to look harder. If you can find the previous ones, it’ll save you a whole bunch of hassle.
https://developer.apple.com/forums/thread/659545?answerId=631425022#631425022
Confirm Your Code Signing Identity
To sign code for distribution you need a code signing identity. Choose the right identity for your distribution channel:
- If you’re distributing an app on the Mac App Store, use an Apple Distribution code signing identity. This is named
Apple Distribution: TTT, whereTTTidentifies your team. - Alternatively, you can use the old school Mac App Distribution code signing identity. This is named
3rd Party Mac Developer Application: TTT, whereTTTidentifies your team. - If you’re distributing a product independently, use a Developer ID Application code signing identity. This is named
Developer ID Application: TTT, whereTTTidentifies your team.
% security find-identity -p codesigning -v
1) A06E7F3F8237330EE15CB91BE1A511C00B853358 "Apple Distribution: …"
2) ADC03B244F4C1018384DCAFFC920F26136F6B59B "Developer ID Application: …"
   2 valid identities found
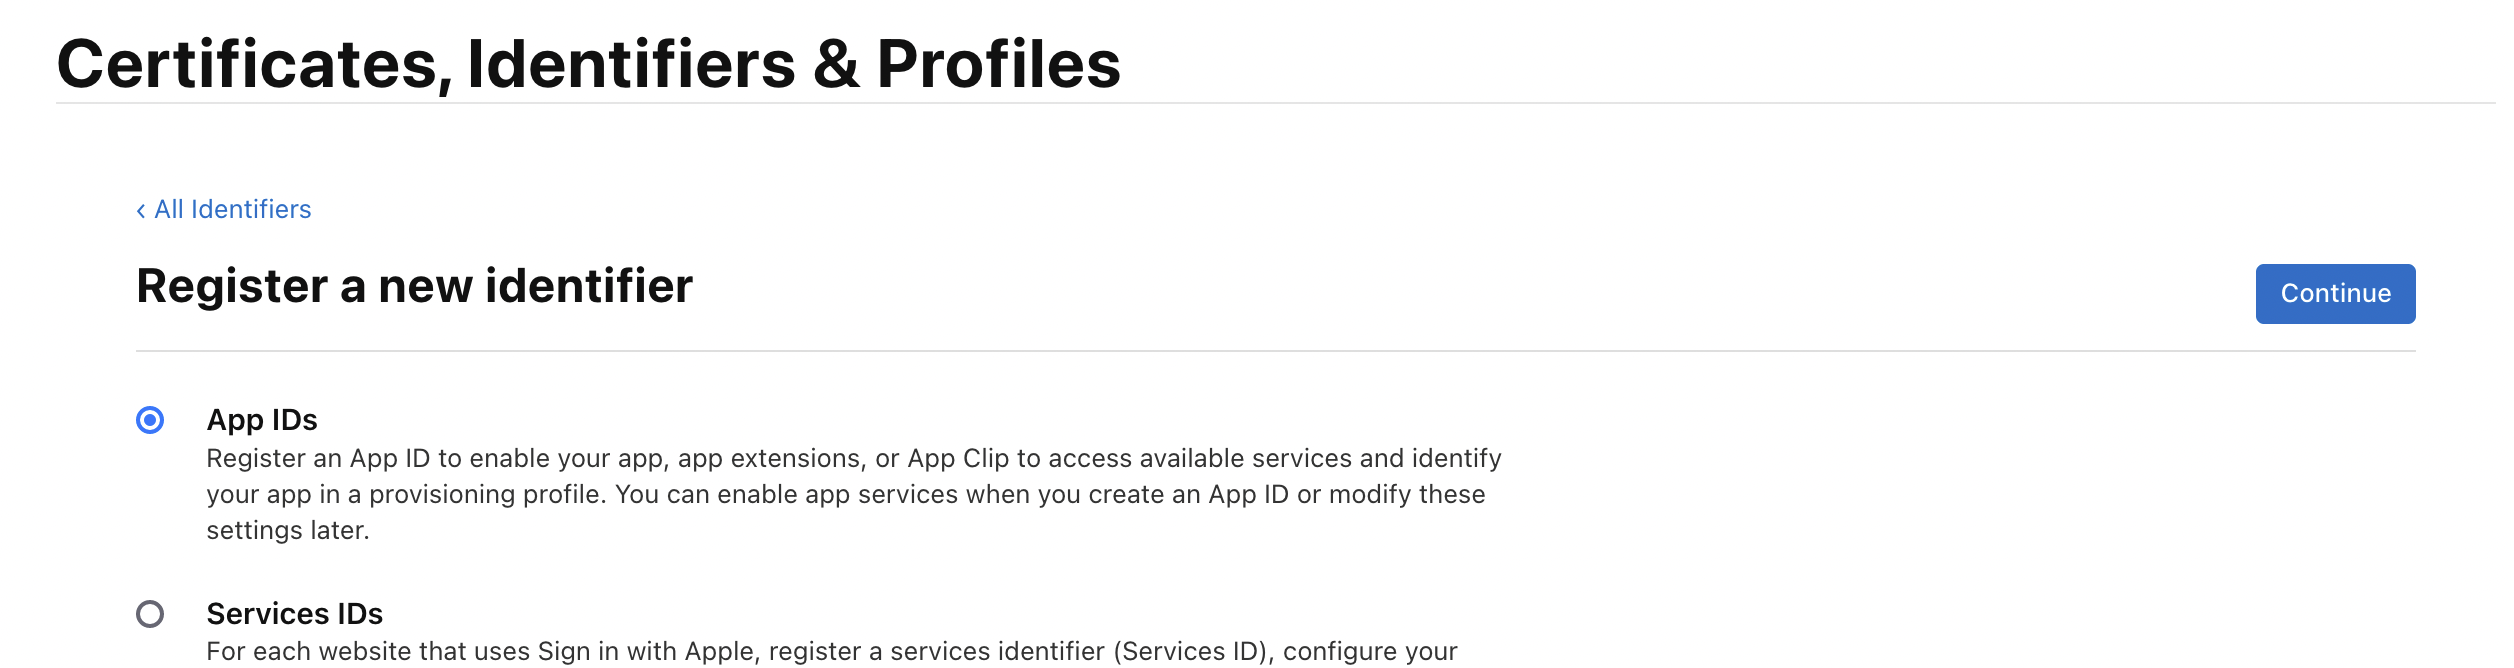
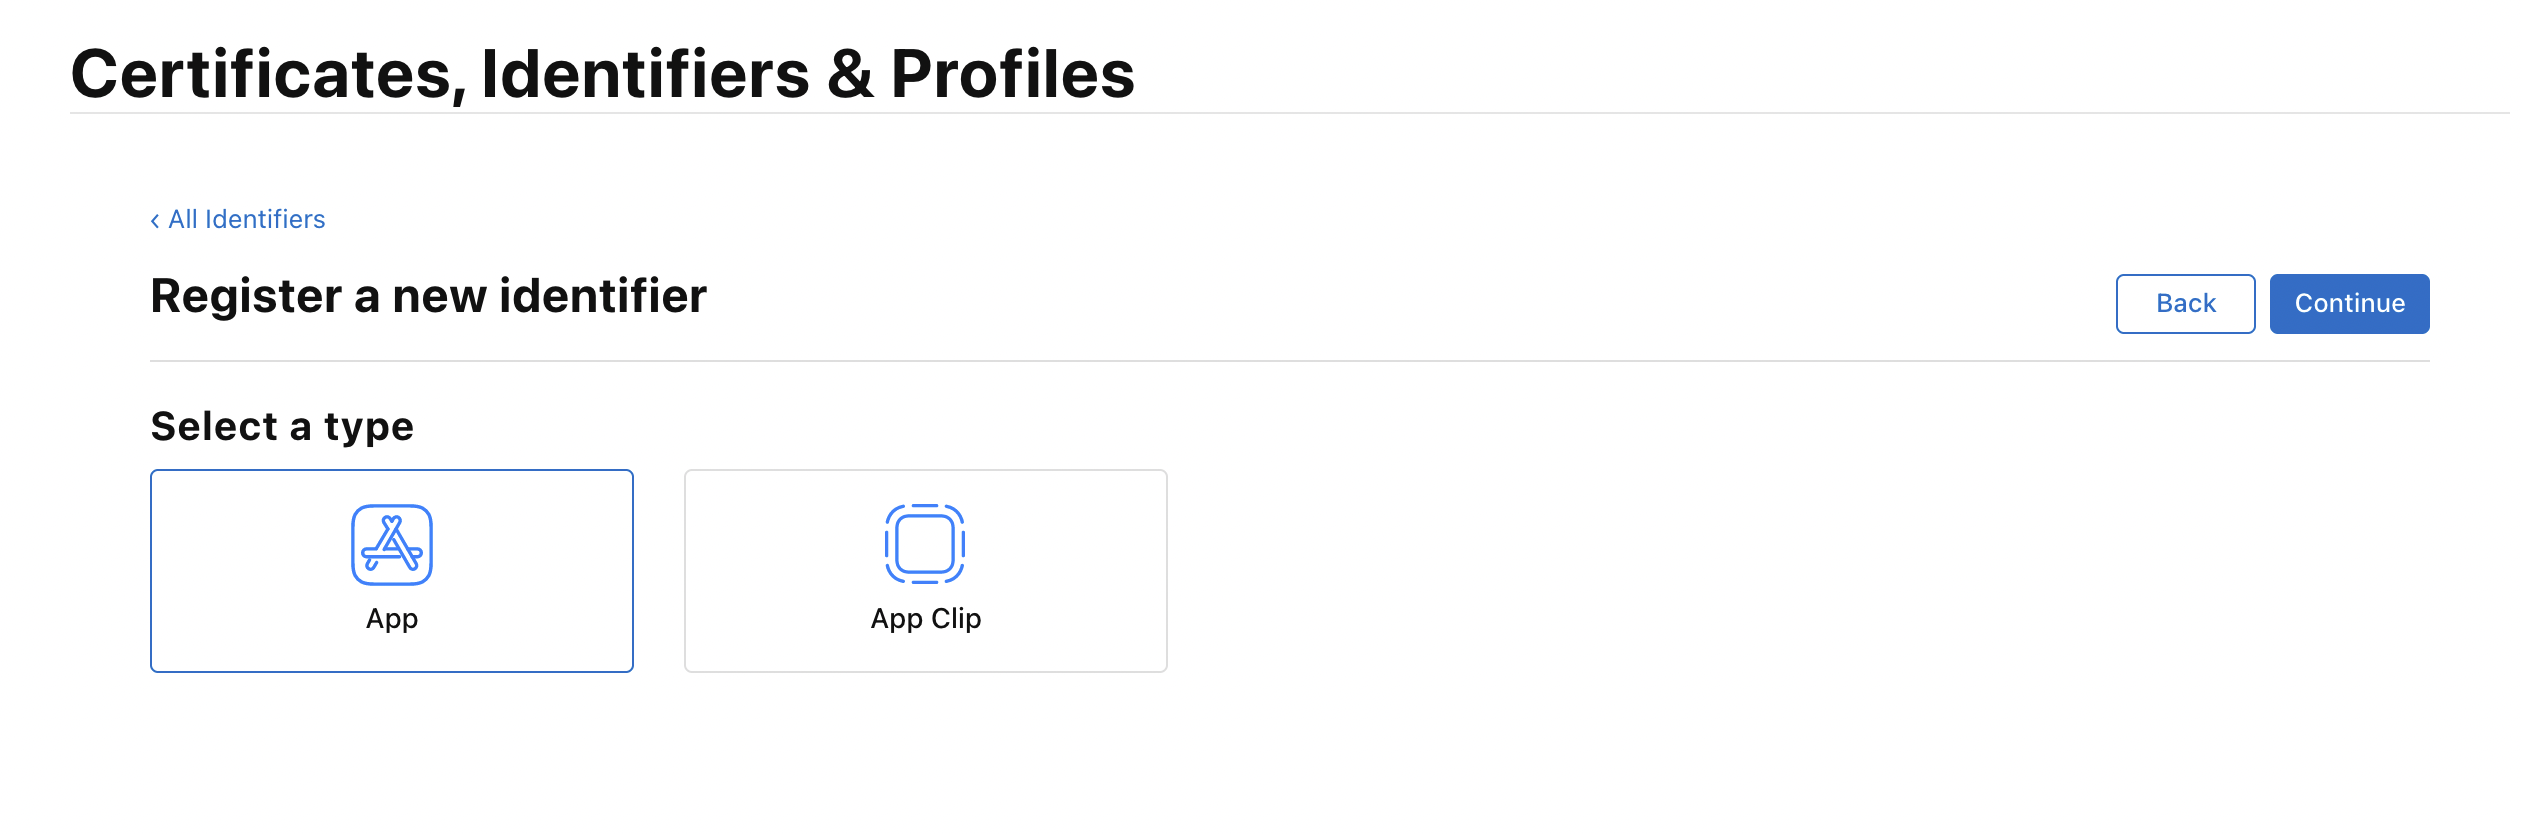
Create an Application Identifier (App ID) & Provisioning Profiles
-
Use Developer > Account > Identifiers to create an App ID for your app. Remember that your App ID is the combination of an App ID prefix and your app’s bundle ID. For new App IDs, use your Team ID as the App ID prefix.
-
Use Developer > Account > Profiles > Distribution to create a
Developer IDdistribution provisioning profile for that App ID.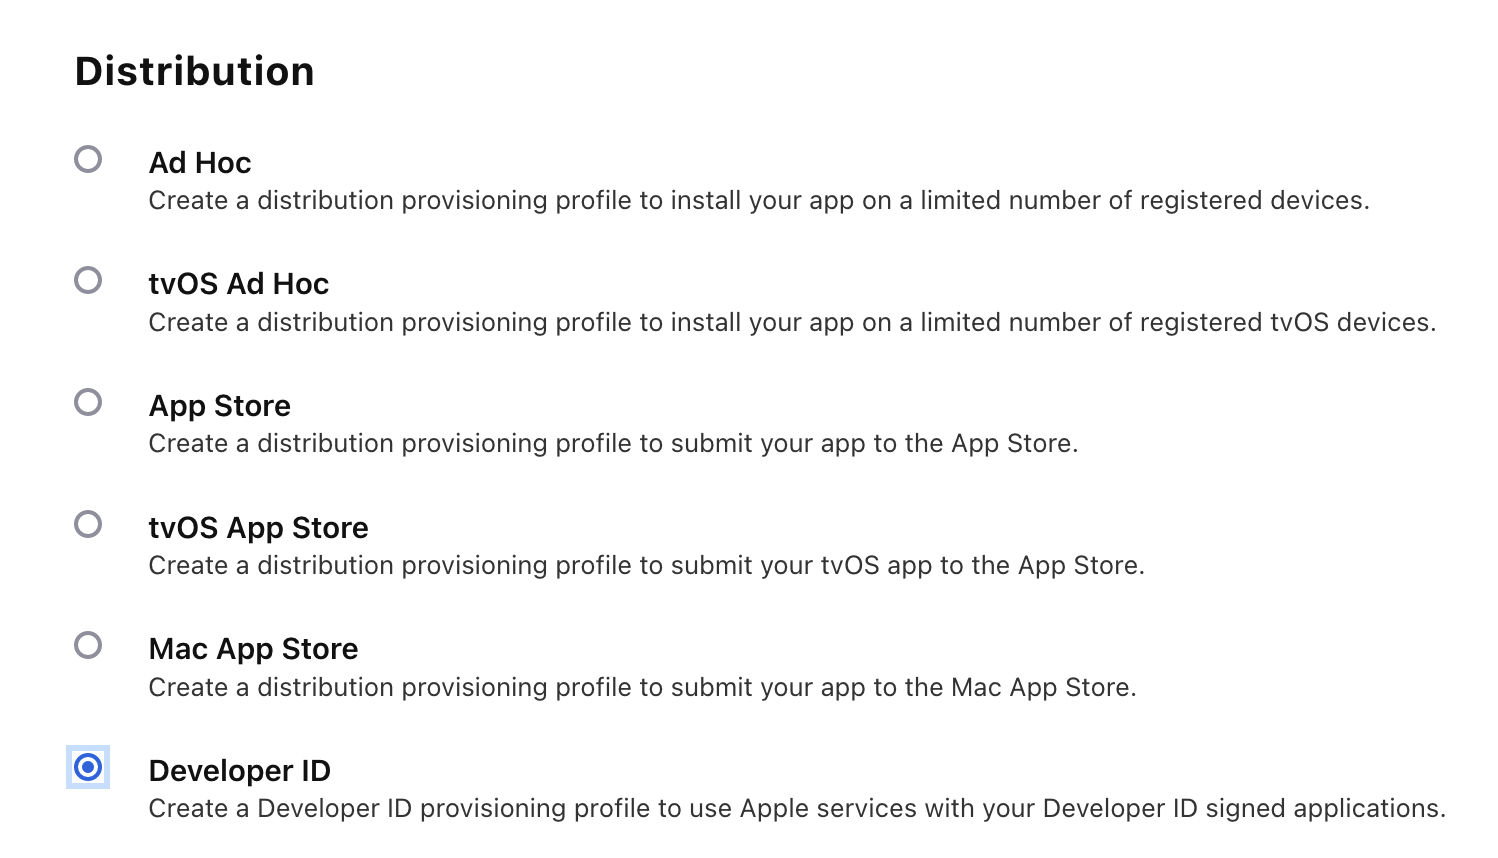
-
Use Developer > Account > Profiles > Distribution to create an
App Storedistribution provisioning profile for that App ID.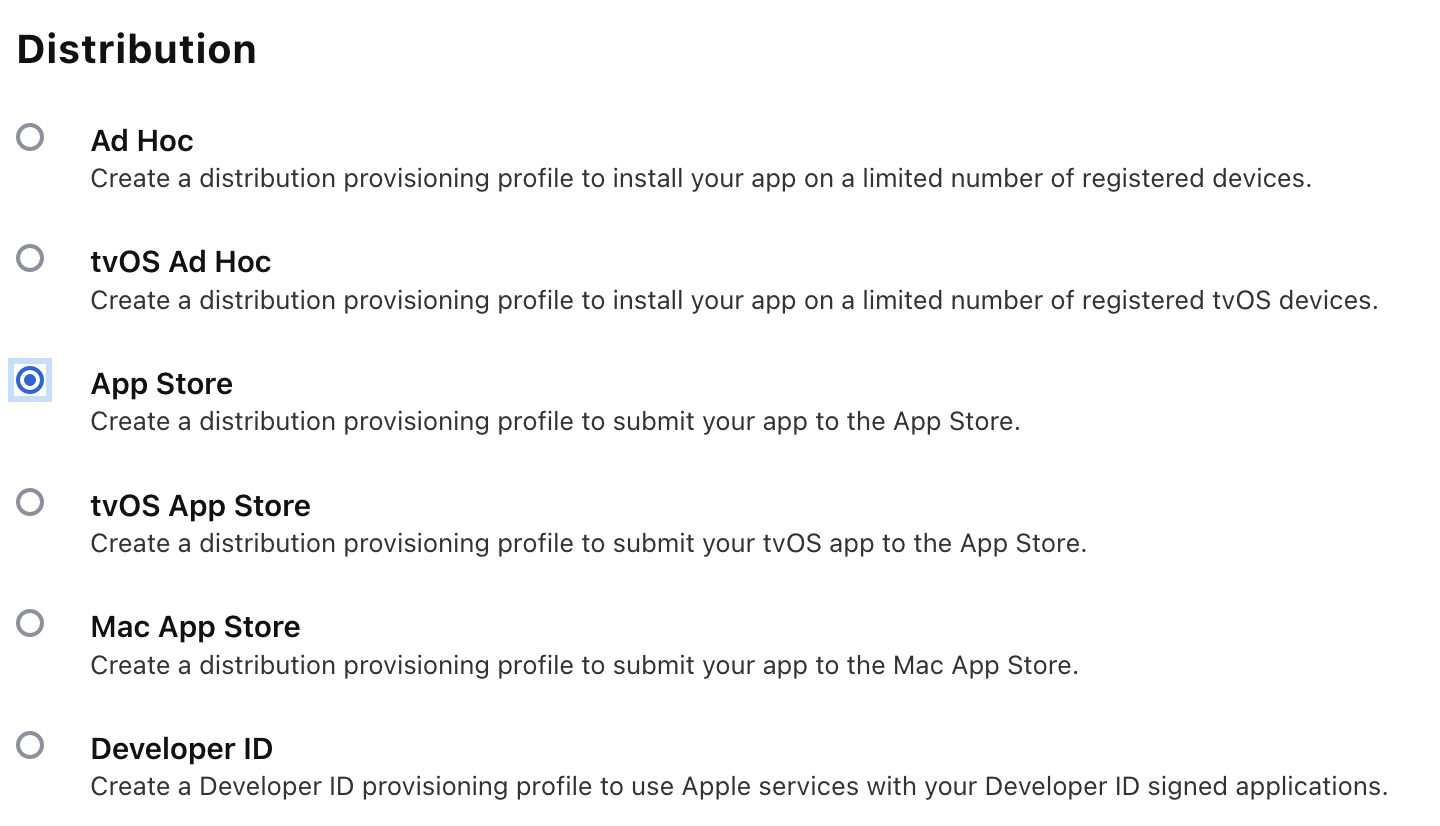
CICD Pipeline
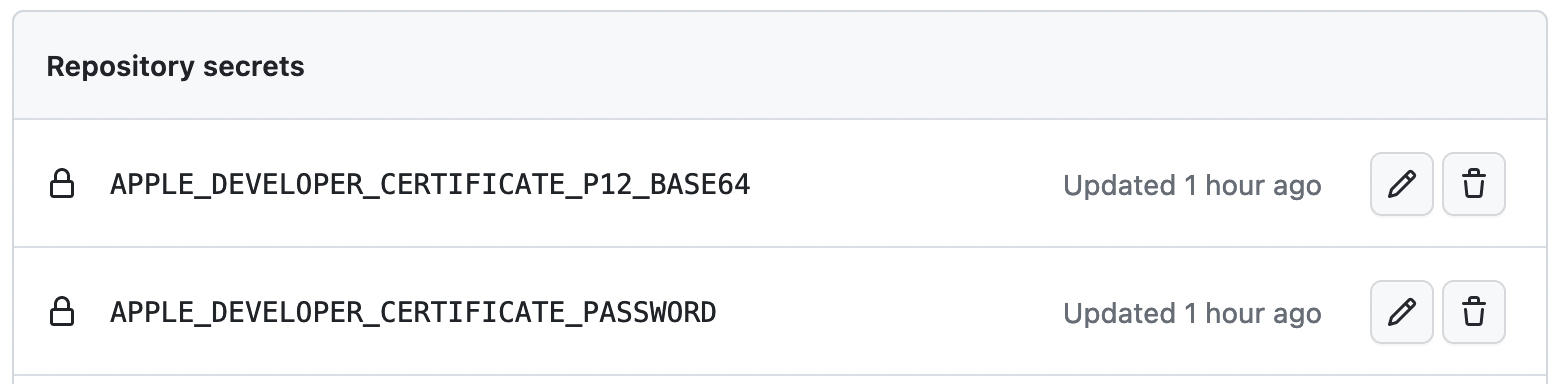
The following Github Secrets are required when attempting to sign a macOS application for Direct Distribution:
APPLE_DEVELOPER_CERTIFICATE_P12_BASE64APPLE_DEVELOPER_CERTIFICATE_PASSWORDAPPSTORE_ISSUER_IDAPPSTORE_KEY_IDAPPSTORE_PRIVATE_KEY
Developer Certificate Secret
APPLE_DEVELOPER_CERTIFICATE_P12_BASE64 is generated by using the Certificate.p12 file you exported from Keychain Access, and then base64 encoding it:
base64 Certificates.p12 | pbcopy
Go to your Github project and navigate to Settings -> Secrets where you can add new secrets. Create a new repository secret, I’ve called it APPLE_DEVELOPER_CERTIFICATE_P12_BASE64, and paste the encoded certificate. Create another secret name, for example APPLE_DEVELOPER_CERTIFICATE_PASSWORD, where you store the certificate password you’ve created earlier.
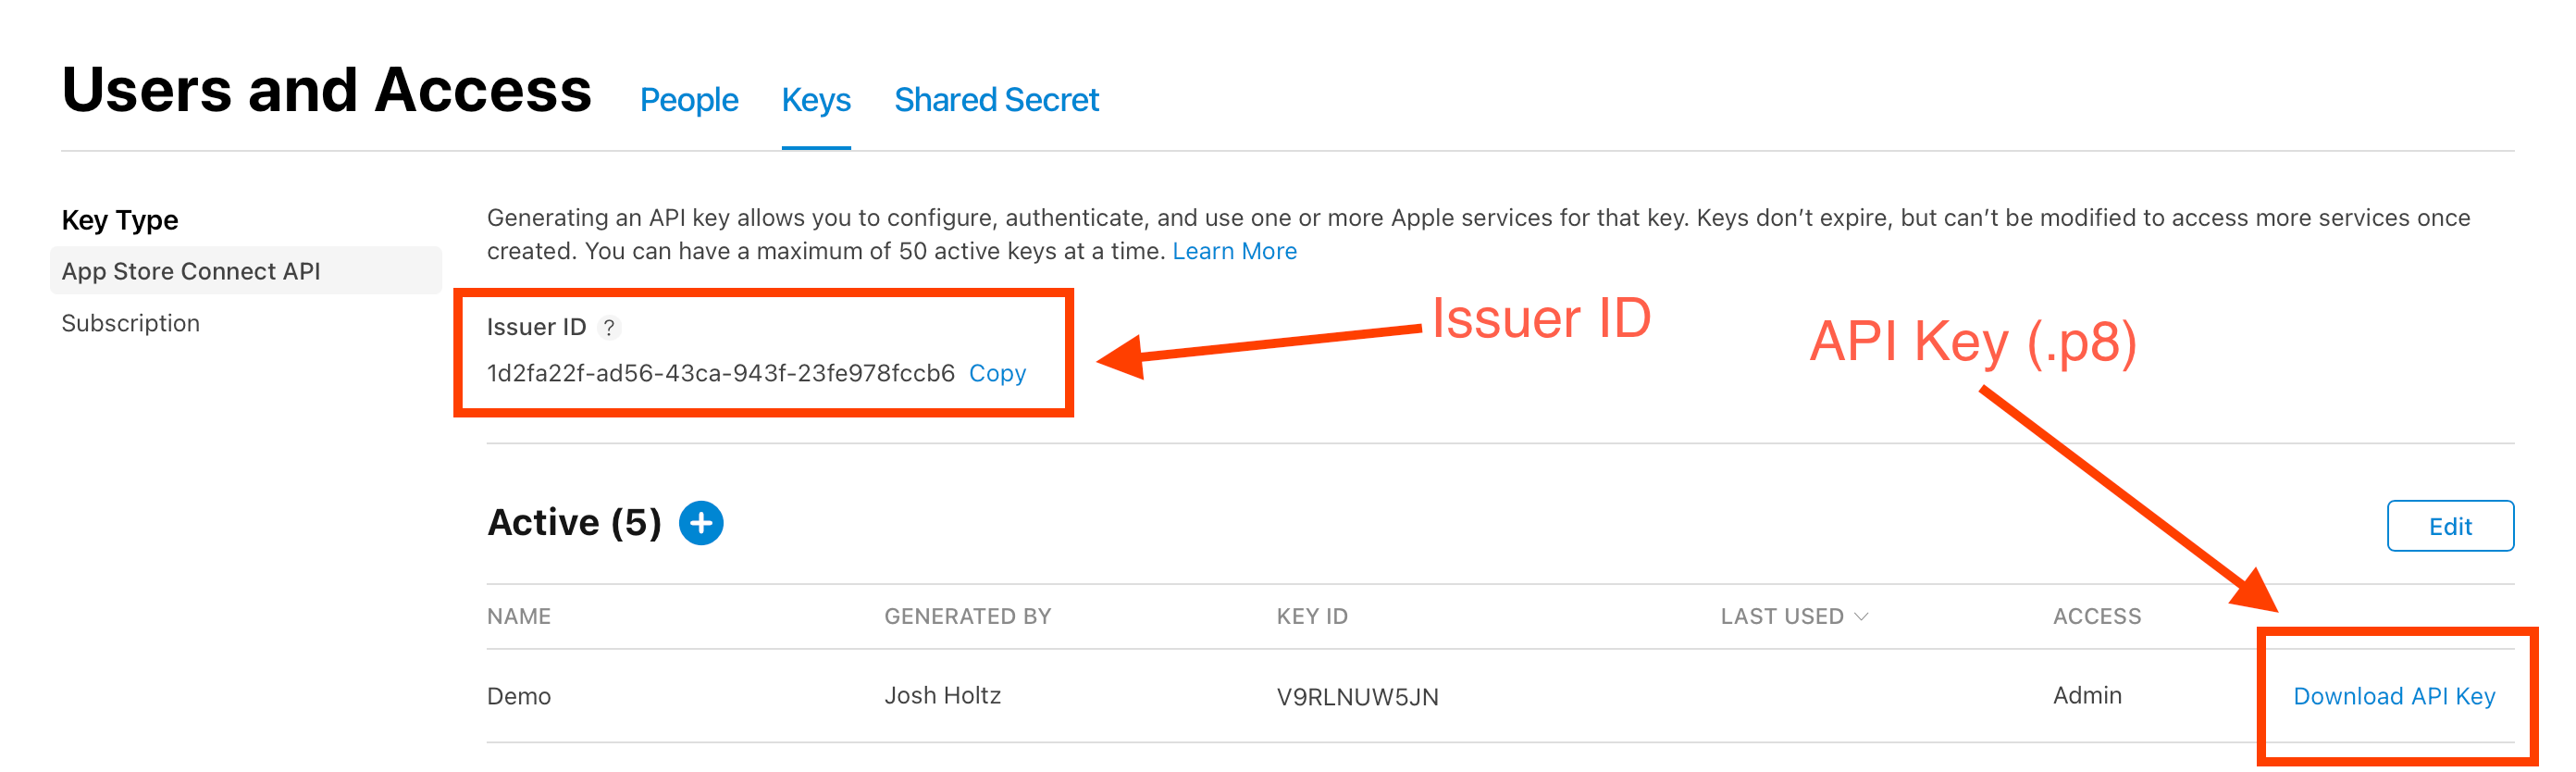
App Store Connect API Secrets
We’ll be using the App Store Connect API to automate our application workflow (signing the application via Notary Service, uploading the application to App Store Connect, and submitting the application for review).
Here are the official instructions for Generating an API Key for App Store Connect API:
- From Users and Access, click Keys. The page opens with the App Store Connect API selected.
- Click Generate API Key.
If you already have an Active API key generated, you can click the add button (+) to add more.
- Enter a name for the key. The name is used for your reference only and isn’t part of the key itself.
- Under Access, select the role permissions to determine what the API can be used for. API keys are applied across all apps so app access can’t be limited for an API key.
Note: you should create your API key with the
App Managerrole, which will allow you to upload applications to App Store Connect, but will not allow you to submit the application for review. - Click Generate.
Once you generate an API key, you won’t be able to edit its name or access level. If you need to make changes, revoke the API key and generate a new one.
Build and Sign Binaries using Github Actions & Gon
TODO
- Automatically bump version
- https://developer.apple.com/documentation/security/notarizing_macos_software_before_distribution/customizing_the_notarization_workflow
- Private Key location for notary tool
- Common Notization Issues
- A Peek Behind the Code Signing Curtain
Upload Application to TestFlight using Transport
TODO
- https://developer.apple.com/help/app-store-connect/manage-builds/upload-builds
- https://help.apple.com/itc/transporteruserguide/en.lproj/static.html
- https://developer.apple.com/forums/thread/685723
Extract Provisioning Profile
- https://maniak-dobrii.com/extracting-stuff-from-provisioning-profile/
- https://developer.apple.com/documentation/technotes/tn3126-inside-code-signing-hashes
- https://developer.apple.com/help/account/reference/provisioning-with-managed-capabilities/
- TestFlight for Mac shows “Not Available for Testing”
Apple Small Business Program
The App Store Small Business Program is designed to accelerate innovation and help propel your small business forward with the next generation of groundbreaking apps on the App Store. It features a reduced commission rate of 15% on paid apps and in-app purchases, so you can invest more resources into your business to continue building quality apps that customers love.
https://developer.apple.com/app-store/small-business-program/
- Join Apple Small Business Program ✅ 2023-11-17
Frequent Issues:
- ITMS-90242: The product archive is invalid - The Info.plist must contain a LSApplicationCategoryType key, whose value is the UTI for a valid category. For more details, see ‘Submitting your Mac apps to the App Store’.
- https://developer.apple.com/documentation/bundleresources/information_property_list/lsapplicationcategorytype
- ITMS-90869: Invalid bundle - The “fasten.app” bundle supports arm64 but not Intel-based Mac computers. Your build must include the x86_64 architecture to support Intel-based Mac computers. To support arm64 only, your macOS deployment tar
- https://dev.to/thewraven/universal-macos-binaries-with-go-1-16-3mm3
- https://stackoverflow.com/questions/30301179/missing-required-icons-when-submitting-app-with-application-loader
Badges
https://tailwindcomponents.com/component/store-buttons-badge
References
- https://developer.apple.com/programs
- https://developer.apple.com/app-store/small-business-program
- https://wails.io/docs/guides/signing#macos
- https://wails.io/docs/guides/mac-appstore
- https://www.wellnessliving.com/knowledge-sharing/knowledge-base/enrolling-apple-developer-program-organization/
- https://localazy.com/blog/how-to-automatically-sign-macos-apps-using-github-actions
- Packaging Mac Software for Distribution
- Creating Distribution-Signed Code for Mac
- About Developer ID Application Certificates
- TestFlight, Provisioning Profiles, and the Mac App Store
- TestFlight Transporter
- https://github.com/mitchellh/gon
- https://github.com/create-dmg/create-dmg
- App Specific Passwords
-
App-specific password not available from Managed Apple ID